background

Friday, April 29, 2011

My Favorite Cartridge Blog Hop


Please Note: Most other sites on the hop will be live tonight at 7:00pm. I am early as I have cub scout outing!


Welcome to the "My Favorite Cartridge Blog Hop!" Thank you to Erica for putting this hop together! So, are you wondering what my favorite is? I actually wrote Erica that I would take Storybook and if that was taken, Straight from the Nest. So, she let me have both! Well, it is too hard to chose one favorite! And I think some of the newer carts I don't even have yet could be my new favorites (say Damask Decor).


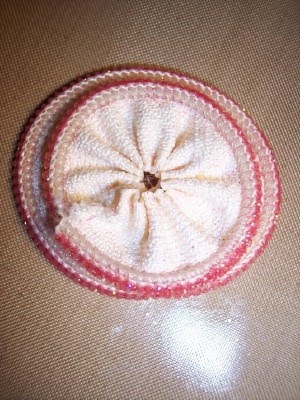
I am sharing a layout I made for my Grandmother-In-Law's 90th birthday. The center medallion is cut from Straight From the Nest at 10". I love cartridges that had shadows of the images so I can pull all my colors together! The brown card stock had a pearl finish and was quite heavy. I had to cut it with my heavy duty blade at a 6 on the blade housing. You may find this true of glitter card stock too!


I used Storybook to cut my journaling block and stretched it in my Design Studio to fit my Lil Davis Designs stamps by Fiskars. I am loving these stamp sets for journaling! Seems a small spot stamped helps me to get my journaling done, and I got the whole set for $3.00 on Scrapbucks.


Flowers are Prima, paper and pearls are Close to My Heart.


Now, how about some blog candy? I am offering a $15.00 gift certificate to either of my Etsy stores: Scrapingcovers and Scrapguild.etsy.com, and FREE shipping of your item to the US or Canada. I welcome entries and winners outside the US and Canada and ask that you pay any difference in shipping. So, here is how to enter my blog candy drawing:


Visit my stores above or my video at YouTube about my scrapbag and tell me what you like best in a comment on this post. You can find my video here. Be sure to leave a method to contact you in your comments and in a safe manner! For instance, jsmith at hotmail dot com is safer than typing in your actual address.


You do NOT need to follow my blog. If like what you see, please follow but I don't believe in requiring this for an entry! I am attaching a picture below of one of my scrap bags and one of my Cricut dust covers. I do make covers for other cutters such as Pazzles, and Silhouette. Custom orders are welcome! Winner will be drawn on Monday, May 2, 2011.


Your next stop on the hop is: Jamie Blast off http://myamusinglife.blogspot.com/


And in case you get lost here is the entire line up below.


2. Erica and Erin Preserves http://ericaanderin.blogspot.com/


3.Bee Scrappy Walk in My Garden http://medinabeescrappy.blogspot.com/


5.Margarita simply charmed, new arrival http://magalycreates.blogspot.com/


9. Amanda Locker Talk. http://craftsbyamanda.blogspot.com/


12.Patricia nifty 50s ME http://mycricutcraftroom.blogspot.com/2011/04/patricias-nifty-fifty-cartridge.html 13.Clare Storybook, Straight from the Nest http://www.cricutcraftyclare.blogspot.com/ (you are here)


15. Esther Carosel http://esthrmend.blogspot.com/


16. Misty From my kitchen http://www.abusyplace.blogspot.com/


18. Serafina Birthday Bash http://myquserasera.blogspot.com/


Friday, April 22, 2011

I am the Guest Designer at Art Glitter Again!


I am the guest designer at Art Glitter's Blog again. Check out these pretty sandals and find instructions at the Art Glitter Blog! You can use a charm filled with pretty paper, glitter and liquid glass, or a pretty flower with Gala Glitz, even a toe ring!

Wednesday, April 20, 2011

What's Your Project Runway Paper Crafting Site?


One of my sisters loves Project Runway and encouraged me to apply. She knows I have a fashion design background and has great faith in my talent. But, this in not my dream. It got me thinking though, what would be my "Project Runway" dream? What business would I like to break into, and where would I want to try and get my foot in the door?


Have you guessed where I'm going with this yet? I have a dream, and my "Project Runway" would be winning a challenge at Moxie Fab World. If they had a competition on a reality tv show that involved paper crafting, I would so be applying! And since they don't have a show, I am happy to be inspired by their challenges and enter. Having a Moxie Fab World badge, would be like making it to "Fashion Week" for me! Being a Moxie Faber of the Week would be like being a winner of the season!

So, this week I am in again on the Tuesday Trigger at Moxie Fab. The inspiration photo (top photo above). And I pulled out my "My Favorite Things" products this week. I used the MFT Wednesday Stamp Sketch last photo above. And my card is in the middle. I love these rolled roses! I love how teeny tiny the MFT Die Namics die Mini Rolled Roses lets me cut these! Just the perfect thing for the Crepe Bouquet interpretation!

Wondering about my green lace? Yes, it is my cut file! See the post from April 9th HERE, for the download. To get the shadow, just select the lace and click on the Style drop down arrow in the Appearance Dialog Window and chose shadow rounded. Oh, I love this feature in SCAL2!

It is probably, much to busy for Moxie Fab. You know I am a chronic space filler! But that is one of the things I enjoy about Project Runway, the over the top designer! Some day, I may even have the simplistic beauty that will win me a Moxie Fab World Badge, in the meantime, I continue to love their inspiration and creating! Now what's your "Project Runway" Paper Crafting dream?

Supplies used:

Stickers (MOM) My Little Shoebox

Stamps Flower Girl Pure Innocence My Favorite Things

Rose Die My Favorite Things Die-Namics Mini Rolled Roses

High Tea Doily Die Die-Namics My Favorite Things

Trying my 1st Video Promotion

My best selling item at crops is my scrap bag, but in my Etsy stores it does not get much notice. An Etsy friend suggested I make a video high lighting the features of my scrap bags and post it to Youtube.
So, here I am going to try and share it with you today. No pictures of me as I am convinced I don't take good photos! And I am not very fond of my voice either!

Monday, April 18, 2011

Easter Card with Lace Card Stock


Just sharing a card I made today, to submit for the Fiskars Design Team. I used some Basic Grey lace card stock and some Close to My Heart Stamps to make this. I love this simple card and it was so quick! Wish me luck!

Also, I would like to mention that Blogger is now allowing me to use a larger photo for my posts, but I cannot adjust the height and width in an even proportion. So, if you would like a clearer picture, please click on the image! I hope you can see the pretty detail of the stickles in the middle of the lace paper!

Supplies used: Close to My Heart stamp sets Easter Eggs, and Speckled Eggs, Stickles in Candy, Lime Green and Yellow, Basic Grey Lace paper, Fiskars Round n' Round Large Punch.

Saturday, April 16, 2011

Ric Rac Roses You Have to Try

Yesterday, I stumbed upon an Etsy Store with roses made from ric rac. I knew I could make them, so I googled Ric Rac Roses Tutorial. Apparently, there are several methods. My first attempt was with some Jumbo Ric Rac so, I decided to try the fold in half method. I can't find the blog that had the tutorial this morning, so I apologize for not giving the credit here to the author. Here are the steps I used: 1) Finish the inside edge of your ric rac with frey check and once dry trim to a neat edge. 2) Fold your ric rac in half and press. 3) Begin rolling your rose tightly and whip stitch the base together matching up the folded edge, so that it can lie flat. 4) Do NOT fuss with your petals until finished! 5) Once your rose if the size you like, tie a knot and finish the final edge with frey check. Allow to dry and trim. 6) Fold back your outer petals as desired, leaving a rose bud center. The second method is to entertwine the ric rac, but I have no small ric rac in the house, so I will have to attempt that on my next run to the store.

Friday, April 15, 2011

Library Memories


This month the Etsy Blogger's Carnival theme is libraries. We are supossed to write of our fond memories of the library. So, I'm taking a break from a crafty post and sharing some of my fond memories of my libraries! Oh, where do I start? I think I will start with our weekly trip! Visiting the library was as regular as going to church for my family. I think it saved my parents sanity! I loved this as a first place to have some independance making my own choices and venturing out of my parents line of vision. Somehow it seemed welcoming from the begining. As a teenager, we loved to spend cooler summer days reading books while listening to albums there. We lived in Arlington Heights IL and the library there was fortunate to have a good tax base from a local race track. We had lot of things to check out others did not: albums, art work, computers and more. We even had a book mobile! I can remember visiting that when it came to the park across the street. I even worked on the book mobile in highschool. The picture above is the Arlington Heights Memorial Library.


College memories of the library include one of the largest libraries in the nation, at the University of Illinois. Of course there are actually libraries all over the campus and they consider them one. The picture above is the Grainger Engineering Library, which I only visited once. The story of the under ground library to save the test fields. The stacks there, stick out in my memory. Getting a pass to go back into the stacks as a graduate student and seeing how large the collection was. The movable bookshelves, to house all the books. And now as a parent myself, I love the library still! We had play groups for toddlers during the winter. Books on tape for family vacations and just every night bedtimes. Books on inter-library loan means we can almost always get what we want! Videos, classes, CD's and more even if you don't read the library is a wonderful place to visit! In this difficult economy, I am even more thankful for my library! Even my scrap booking and paper crafting guild meets at my library! I love that I can paper craft and get books on the same night!

Thursday, April 14, 2011

This Week's Tuesday Trigger is for Mom!


I'm trying the Tuesday Trigger Again at Moxie Fab World! They're calling the inspiration piece Porch Play. The item in this photo that inspired me was the framed mirror. I was just looking for an excuse to get out my latest Heartfelt Creations Die called "Decorative Window!"

I cut the center crossbars out of my die cut, and stamped on white card stock underneath using my Close to My Heart Stamp set "My Mom". I used my Basic Grey "Two Scoops Swirl" set to make the pretty swirls in teal. The rose is cut from My American Crafts Ribbon Rose and the measuring tape is a stamp called "Cherry Hill" by October Afternoon. I believe the Celebrate ribbon may be Martha Stewart. I glued a bit of eyelet from the stash underneath the stamped tape measure and added a few sequins and beads in the wedding dress stash. Card stock is Bazzil.

Wednesday, April 13, 2011

My Latest Pazzles Cover


I love this fabric by Samantha Walker for Riley Blake! And with all the butterflies, I thought it would be perfect for a Pazzles Inspiration.
I had a chance to play with fuse and bond making my butterfly embellishment. What fun! I will try layering more on the background for the fraying effect.
IF you like this cover you can find it at my Etsy store. Colors not right for your craft room? I love custom orders! Just let me know your color and fabric prefences and I will send you photos for approval.

Saturday, April 9, 2011

Tear Drop Lace Border to Share


This morning I visited Sarah Martina's Blog and saw a great tutorial on how to get the corrugated cardboard look on my embellies! I love her blog enough to subscribe to posts! And this morning she had the most scrumptious lace she found at the dollar store on her Mother's Day card! Here is a close up of her lace that inspired my cut file and be sure to check out her blog for the finished card!

I have recently been to my local dollar stores and found no such trim. So, I got out my SCAL2 and made up an SVG. You can down load this scalloped lace border HERE. As always, I love your comments when you like this enough to download! It encourages me to share more.

Friday, April 8, 2011

Work the Stash With Glitter!


Like me, you might have a stash of supplies that you keep telling yourself you need to use before you buy more. I have found it a great idea to devote a day to using up the stash and to use Art Glitter to inspire me! Be sure to check out the Art Glitter blog for more ideas for using glitter on your stash!
This Wednesday, I went through my stash of trims and pulled out some eyelet lace trim. I love all the rosettes that people are making with paper, and decided to use that idea with my eyelet. So, I cut a strip 18” long and folded it in half right side together. I matched my pattern on the edge and sewed a seam to form a band. Then I ran a basting stitch along the inside edge of my eyelet and pulled to gather the center.
Using another piece of eyelet, I used my Art Glitter Fabric Dries Clear Glue and embellished it to match my card stock and patterned paper. I think this would look wonderful on an Easter, or Mother’s Day Page! Here is my trim before embellishment.
Using the Dries Clear Fabric Adhesive and my Hibiscus 297 Ultrafine Transparent, and Bananan 92 Ulfrafine Transparent Glitter I followed the pattern of the lace. A dries clear glue is so important with lace! Here is the after picture.
I love that my Art Glitter gives me the look of an expensive and fashion forward scrap booking embellishment for less! Now, what if you don’t have a stash of eyelet trim? You can get some at your local fabric or craft store and buy just 1/3yd to make a 12 x 12 scrap booking page. Let’s say the trim runs $4.99 a yd, now use a coupon for 40% off and only purchase your 1/3yd and you have some eyelet for $0.99.
Still think that’s more than you want to spend. Then get the look with your paper punches, embossing folders and white paper and add your Art Glitter! Here is a faux eyelet I made using my Martha Stewart border punch and my Cuttlebug embossing folder.

Now I used all of these handmade embellishments to scrapbook a special dress I designed and made: my wedding dress. Another tip I would like to share is the use of corner punches for holding your professional photos. Someday, my children may want to frame some of the professional photos I scrapbook. So, I like to use corner punches and adhere the photo mat only to my page. I then slip my photo under the corners and later, they can be removed without being damaged.
And I would just like to thank Scrapbooking.com and My Little Shoebox for the paper and stickers on this page! I won them by commenting on the Scrapbooking.com Facebook page.

Supplies Used:
Art Glitter Dries Clear Fabric Adhesive
Art Glitter 267 Hibiscus Ultrafine Transparent Glitter
Art Glitter 92 Bananan Ultrafine Transparent Glitter
Eyelet (Rosette)
Eyelet (border) Hobby Lobby
All the paper is by My Little Shoebox from the Sew Cute Line: Nothing Buttons, Made with Love, Hand Made
Stickers from My Little Shoebox Sew Cute Line
Paper Doily My Little Shoebox Garden Party Buttercup
Title Foverever Young Cricut Cartridge
Corner Punch EK Success

Sunday, April 3, 2011

Basic Grey Challenges #41: More Than One Fold


Today I am posting an entry for the Basic Grey Challenge Blogs, More than One Fold Challenge. I used my Eva Line paper and some chipboard to make a MP3 player holder. I believe the flower is K & Company or Jolee. I got the chain at Michaels and the attachment thingies are Close to My Heart. It's fun to make a 3-D project and I love listening to music while I scrap!

Saturday, April 2, 2011

A Fun & Flirty Use of Negative Space


I had so many comments on my dress form stamp with a skirt that I thought I would try another version for my sister's birthday card using my Cricut. I decided to pull out my Forever Young Cartridge and use the negative space to make my skirt.
Here's how to get the effect above:
1) Using my Cricut DS software and my Forever Young Cartridge I chose the size 5 inches, so it would fit in a A2 card.
2) Use George to temporarily draw a rectangle that is 4 1/4" x 5 1/2" and placed my figure where I wanted it and then REMOVE the rectangle and cut FIGURE ONLY in my Basic Grey Oh Baby Boy paper. Notice that I ran the stars in the direction of the figure to add to the height of my figure.
3) Cut the dress card stock at the same size 5".
4) Now cut a Navy rectangle at 5 3/8" to fit the back of card front
5) Cut one yellow organza fabric in a strip 5" long and 2" wide
6) Run a basting stitch along one long edge 1/4" in from the edge and gather it up to fit the waist of figure 1/2" long and tie a knot. I began my basting stitch in from the short edge 1/4" and stopped 1/4' in from the edge. You will want this to prevent raveling and to hide you raw edges under the cut.
7) Add double stick tape to the back edge of of the figure along the sides of the skirt ONLY at this time.
8) Now add your organza fabric, placing the gathering at the waist line
9) Adhere the ribbon to the card front
10) Adhere the navy card stock to the back of your card front
11) Add adhesive to the back of the dress and carefully slip it under the organza skirt to line it up.
12) Adhere your skirt at the waistline with glue dot or glue gun
13) Cut a bit of ribbon 1" long and tuck under each side 1/4", then glue on top of gathered waist to hide stitching and raw edges
14) Cut Fabulous at 1" and adhere to card
15) Add pearl at pony tail
16) Add sentiment inside, "Hope your Birthday is as fabulous as you are!"
Here is a close up of the skirt. The neat freak in me love the finished look to the skirt edges!

Friday, April 1, 2011

Kicking It Up a Notch


It’s that time of year again: Garage Sale season! In this economy, many more of us are holding garage sales and shopping garage sales. I love visiting them and looking for pieces to embellish. At my first sale of the season, I found an old sewing box in the shape of an iron. I thought it would be the perfect thing to embellish. And since it was a sewing box, I thought it would be the perfect thing to embellish with a zipper flower. I used zipper tape to try the Maya Road Zipper Flower Tutorial. You can find their tutorial at: http://mayaroad.typepad.com/mayaroad/2011/02/zipper-flower-tutorial-one.html I loved their idea of cutting extra petals! Their zipper tape had metallic teeth that popped on the flower. My zipper teeth were the same color and I wanted some contrast, so I got out my Art Glitter and above are the results. Isn't it pretty!?
To get the glitter to stick to my zipper teeth, I used my Art Glitter Ultra fine tip again.
The tiny bead of glue was perfect for the zipper teeth. You will see as you use this that the glue will drop to the spots in between the teeth after applying. Just sprinkle the glitter onto the teeth and flip the zipper tape over, then sprinkle on again on the underside and allow to dry before sewing and gluing.
I then followed the instructions from Maya Road and added a base of cardstock or felt. Following their directions; and adding my base, I did the following:
1) Cut one 12 inch piece of zipper and separate the two sides
2) Cut two or three 3 inch pieces of zipper, using one half of the zipper. You should have 4 pieces.
3) Apply your glue and glitter and allow to dry

4) Using a hand needle and thread, run a basting stitch along the outside fabric edge of the 12 inch zipper piece. Pull to coil your longest piece of zipper, creating a staggered effect with the zipper teeth outside the previous layer. Tack in place with stitches or glue gun.

5) Using the same thread and needle, run a basting stitch on the other three pieces of zipper and gather.
6) Create curved petals and tuck them under the flower rolls in the flower created in step 3. These petals will look better if you go for the rule of three and try to create the look of three outside petals. See top picture.

7) Tack in place with glue gun or thread.
8) Punch out a 1 ½” circle and glue your flower to it for a paper craft project, or to felt for a sewing project.
9) Add a button, rhinestone or bead in the center with glue or a thread and needle.
To embellish my sewing box, I painted it cream and chalk inked the edges. I covered it with some My Mind’s Eye paper from the Lost and Found Line, added my zipper flower, a rolled felt rose and some wrinkled seam tape. See the bottom of the post for the complete list of supplies.
So, hit those garage sales for your next craft project and pull something out of your stash today and kicking it up a notch with some Art Glitter!
Supplies Used:
Art Glitter Hibiscus 297 Ultrafine Transparent (choose any color you like)
Glue Gun and sticks
My Mind’s Eye Lost and Found Paper
Stampin Up Chic Botique Stamp
My Favorite Things rolled Rose Die
Seam Tape
Wooden Box
Modge Podge
Circle Punch 1 ½”
Button
Ivory Cardstock
SVG Rolled flower from Jill D-Zines (Ivory flower with red center)
Stickles X-mas Red (paper flower center)

LinkWithin

Related Posts with Thumbnails